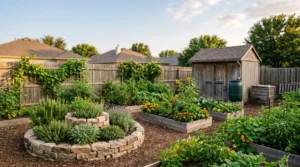
Permaculture is not about creating a messy, wild jungle; it’s about applying smart design tools to make your conventional garden more efficient and self-sufficient.
- You can dramatically increase productivity by observing natural patterns like sun and shade before planting a single seed.
- Simple structures, like a shed or a spiral bed, can be designed to serve multiple functions, saving you time, water, and effort.
Recommendation: Instead of trying to implement all 12 permaculture principles, start by focusing on one key concept: observation. Understanding your unique space is the first step to transforming it.
The dream of a lush, productive, and eco-friendly garden often clashes with the reality of a standard suburban yard. You want to do more for the environment, reduce your workload, and maybe even grow some of your own food, but the images of sprawling “food forests” and complex earthworks associated with permaculture feel overwhelming and, frankly, a bit messy for the neighbourhood. Many guides will tell you to memorize twelve abstract principles or immediately start a huge compost pile, leaving you wondering how any of it applies to your neat lawn and flowerbeds.
But what if the core of permaculture wasn’t about radical transformation, but about smart, incremental optimization? What if its most powerful ideas were not about letting things go wild, but about designing a clean, orderly, and highly efficient ‘managed ecosystem’ that works with nature, not against it? The secret isn’t to abandon your suburban aesthetic, but to enhance it with principles of efficiency, multi-functionality, and observation. It’s about making every element in your garden, from the garden shed to the edge of your patio, work harder and smarter.
This guide will demystify permaculture for the everyday homeowner. We will move beyond abstract theory and focus on practical, actionable strategies. You’ll learn how to boost productivity in shady spots, turn a simple shed into a multi-purpose resource, avoid common planting mistakes in small spaces, and create a garden that starts to sustain itself, freeing you from the endless cycle of buying fertilizer and compost. It’s time to see permaculture as a set of design tools, not a rigid doctrine, and unlock the hidden potential of your suburban yard.
To guide you through this transformation, we’ve broken down these powerful concepts into practical, easy-to-digest sections. This structure will help you apply these ideas step-by-step to your own garden.
Summary: A Practical Guide to Suburban Permaculture
- Zone 1:How to Boost Photosynthesis in Shady North-Facing Gardens?
- One Element, Three Uses: How a Shed Can Collect Water and Reflect Heat?
- The Guild Trap: Why Planting 7 Species Together Can Fail in Small Spaces?
- Observation First: Why You Should Wait a Year Before Designing?
- The Edge Effect: Increasing Yields by Maximizing Borders?
- Sun and Shade: How a Spiral Creates Different Zones for Basil and Parsley?
- How to Establish a ‘Dry Garden’ Backbone in Chalky Soil?
- Creating Self-Sustaining Ecosystems: How to Stop Buying Compost and Fertilizer?
Zone 1:How to Boost Photosynthesis in Shady North-Facing Gardens?
A north-facing garden is often seen as a horticultural dead end, a place where sunlight is a rare visitor and plants struggle to thrive. The conventional approach is to give up on edibles and stick to a few hardy ferns. However, by applying the permaculture principle of ‘using and valuing the marginal,’ we can turn these shady spots into productive pockets. The key is to stop fighting the conditions and instead select plants that are evolutionarily adapted to lower light levels.
Many leafy greens don’t just tolerate shade; they prefer it, as the cooler, moist conditions prevent them from bolting (flowering prematurely). Plants like lettuce, spinach, kale, and sorrel are excellent choices. A study on plant adaptation confirms that shade-tolerant plant varieties increase chlorophyll content and alter their cellular structure to more efficiently capture non-direct sunlight. It’s not magic; it’s biology. You’re simply choosing the right tool for the job. While you should avoid sun-loving fruiting crops like tomatoes and peppers, you can have success with root vegetables like radishes and turnips if they receive at least four to six hours of direct sun.
Experience shows that choosing the right cultivar can make all the difference. As one gardening writer for the Farmer’s Almanac notes from personal experience, some varieties are simply better performers in low light. As they recommend:
I often recommend specific cultivars, like ‘Black Seeded Simpson’ lettuce or ‘Bloomsdale Long Standing’ spinach… I grow this lettuce every spring, and it’s my go-to for shady patches.
– The Old Farmer’s Almanac
To make this work, you can also use reflective surfaces. A light-colored wall or fence can bounce precious light back into the garden bed, further boosting photosynthesis and turning a challenging space into a surprisingly productive one. This careful selection and small-scale manipulation are central to effective permaculture design.
One Element, Three Uses: How a Shed Can Collect Water and Reflect Heat?
In a conventional garden, a shed is a shed: a box for storing tools. In a permaculture mindset, it’s a node in a larger system, capable of performing multiple functions. This principle, “Each element performs many functions,” is about getting the most value out of every single thing you have. Your humble garden shed is the perfect place to start applying this systems thinking.
Its primary function is, of course, storage. That’s its job. But what else can it do? Look at its large, sloping roof. That’s a perfect surface for its second function: water collection. By simply installing a basic gutter system and a rain barrel, you transform your shed from a passive box into an active water-harvesting station. This collected rainwater is free, naturally soft, and perfect for your plants, reducing your reliance on municipal water.
Now, consider its walls. This is where its third function comes in: microclimate creation. If your shed has a wall facing a garden bed, its color can dramatically alter the growing conditions. A dark-colored wall will absorb heat and radiate it back out, creating a warmer microclimate that can extend your growing season for nearby plants. Conversely, painting a wall that faces a shady area a bright, matte white will reflect light and heat. This can provide the extra boost of light needed to grow crops in a less-than-ideal spot, directly linking to the challenge of north-facing gardens. Suddenly, your shed isn’t just for storage; it’s a water source, a heat sink, and a light reflector.
This is the essence of permaculture efficiency. It’s not about adding more things; it’s about making smarter connections between the things you already have. By thinking about how one element can serve multiple needs, you create a more resilient, resourceful, and interconnected garden with no extra clutter.
The Guild Trap: Why Planting 7 Species Together Can Fail in Small Spaces?
The concept of a “guild” is one of the most exciting—and misunderstood—ideas in permaculture. The romantic vision is a self-sustaining family of seven or more plants working in perfect harmony. But in the tight confines of a suburban backyard or a container garden, a complex guild can quickly become a chaotic battle for resources. When too many plants are crammed together, they compete fiercely for light, water, and nutrients, leading to stunted growth for everyone. This is the guild trap.
The problem often lies unseen, beneath the soil. Different plants have different root structures. When they are incompatible and occupy the same soil depth, they are in direct competition. This underground warfare undermines the entire planting. For a small-scale garden, a more effective strategy is simplification and an understanding of vertical space, both above and below ground.
A far more manageable approach for containers and small beds is the classic “Thriller, Filler, Spiller” method. This design principle ensures plants occupy different physical spaces and root zones:
- The Thriller: A tall, upright central plant that provides a vertical accent.
- The Filler: Medium-sized plants that surround the thriller, filling in the middle ground.
- The Spiller: Trailing plants that cascade over the edge, their roots occupying the shallow upper layer of soil.
This method naturally separates root zones, reducing competition and creating a visually pleasing, multi-layered planting that is also a functional, simplified guild.
Case Study: Temporal Stacking
Another smart approach is “temporal stacking,” or layering by time. Instead of planting everything at once, you can pair fast-growing crops with slow-growing ones. For example, by intercropping cabbages with lettuce, you can get a full harvest of lettuce before the cabbages grow large enough to need the space and nutrients. This turns competition into cooperation through smart timing.
Observation First: Why You Should Wait a Year Before Designing?
The most powerful permaculture principle is also the simplest: “Observe and Interact.” In our rush to ‘do something,’ we often impose a design on a landscape before we truly understand it. The result? We plant sun-loving herbs in a corner that’s in shade all afternoon, or we place a seating area right in the path of a chilly winter wind. The permaculture approach urges patience. By waiting and observing your garden through four full seasons, you allow the land to reveal its own patterns.
This year of observation is not passive. It is an active process of data collection. Where does the sun fall in the morning versus the afternoon, in June versus December? This is your sun sector. Where do the prevailing winds come from? This is your wind sector. Where does water pool after a heavy rain, and where does it dry out first? This is your water sector. As professional permaculture designers do, this analysis of people and site informs the entire concept. You’re creating a map of the invisible forces that shape your garden.
This information is gold. Knowing that dry summer winds come from the east helps you place a clothesline for fast drying. Knowing the same spot gets battered by cold winter winds tells you to plant a protective hedge there to shelter more delicate plants. This process of design efficiency saves immense time, money, and heartache by ensuring you put the right element in the right place the first time. It is the absolute foundation of a successful, low-maintenance garden.
Action Plan: Your 12-Month Garden Observation Audit
- Sun Mapping: Once each season, sketch your yard and mark where shadows fall at 9 AM, 12 PM, and 4 PM. This reveals your true full-sun, part-shade, and full-shade zones.
- Water Flow Analysis: During a heavy rain, note where water flows, where it pools, and where it runs off your property. These are key spots for rain gardens or swales.
- Wind Sector Identification: On windy days in both summer and winter, note the direction and intensity of the wind. This determines where to place windbreaks or, conversely, areas for air-drying.
- People and Animal Paths: Observe the desire lines—where do you, your kids, or your pets naturally walk? Design your paths along these routes, not against them.
- Soil Health Check: Dig a small hole in a few different areas. Is the soil sandy, clay, or loamy? Is it full of worms or compacted and lifeless? This dictates your soil amendment strategy.
The Edge Effect: Increasing Yields by Maximizing Borders?
In nature, the most diverse and productive areas are often the edges where two ecosystems meet—the coastline between sea and land, the border of a forest and a meadow. This is the “Edge Effect.” Permaculture teaches us to replicate this principle in our gardens to increase productivity and resilience.
Edges serve as ‘energy traps’ since they are the points where materials, nutrients and organisms flow across ecosystems… Edges create beneficial microclimates.
– Bart Johnson & Kristina Hill, Ecology and Design
In a standard suburban garden, edges are typically straight lines: a straight path, a rectangular lawn, a straight fence line. This is the least efficient design possible. By simply changing the shape of your garden beds from straight rectangles to curving, keyhole, or spiral shapes, you dramatically increase the amount of accessible edge within the same square footage. More edge means more planting space, more access without compacting soil, and more micro-habitats where different plants can thrive.
A keyhole bed, for example, is a circular bed with a pie-slice cutout that allows you to reach the entire bed from a single standing or kneeling position. This maximizes the ratio of growing area to path area. A curving path alongside a garden bed is longer than a straight one, providing more space for planting border-loving herbs and flowers that can attract beneficial insects.
The Edge Principle at Scale: Sepp Holzer’s Krameterhof
While a massive undertaking, Sepp Holzer’s farm in the Austrian Alps is the ultimate example of edge design. By creating a vast network of terraces and ponds on a steep mountainside, he created miles of productive edge in a hostile environment. This showcases how multifunctional terraces and dynamic planting strategies can dramatically increase both yield and resilience, a principle that can be scaled down to even the smallest suburban yard with a simple raised bed.
Every plant you place also creates its own edge, a small zone of influence around it. By offsetting your plants in a triangular pattern rather than a square grid, you allow each plant more access to resources and create more small-scale edge, fitting more productivity into the same space.
Sun and Shade: How a Spiral Creates Different Zones for Basil and Parsley?
One of the most elegant and functional examples of permaculture design for small spaces is the herb spiral. It’s more than just a beautiful feature; it is a masterclass in creating multiple microclimates in a minimal footprint, perfectly illustrating the principles of edge effect and sector analysis on a small scale.
A popular and beautiful design element in permaculture design is the herb spiral. These can create a maximum edge in a small space and even create multiple microclimates to best serve plants with different requirements.
– Harold Thornbro, Redemption Permaculture
An herb spiral is a raised bed that coils upwards, typically built from stone, brick, or wood. This simple structure brilliantly manipulates natural forces. The top of the spiral is the highest, driest, and sunniest point. The soil here is well-drained, making it the perfect home for Mediterranean herbs that love heat and dry feet, like rosemary, thyme, and oregano. As the spiral winds downwards, the conditions change.
The south-facing side of the spiral will be warmer and sunnier, while the north-facing side will be cooler and shadier. Water naturally drains from the top to the bottom, so the base of the spiral is the moistest spot. This gradient creates a spectrum of growing zones. Sun-loving basil can be planted on the sunny middle slopes, while moisture-loving parsley and chives will thrive in the cooler, damper conditions near the bottom. In just a few square feet, you have created a half-dozen distinct micro-habitats, allowing you to grow a wide variety of herbs that would otherwise be incompatible.
The spiral shape itself maximizes the planting edge, giving you far more growing space than a flat bed of the same diameter. It is the perfect marriage of form and function, a productive, self-regulating, and beautiful element that embodies the intelligence of permaculture design.
How to Establish a ‘Dry Garden’ Backbone in Chalky Soil?
Chalky or alkaline soil presents a unique challenge for gardeners. It is typically free-draining, meaning water and nutrients wash away quickly, and its high pH can make it difficult for many plants to absorb essential minerals. The permaculture solution isn’t to fight this reality with endless chemical adjustments, but to work with it by establishing a ‘dry garden’ backbone of plants that are naturally adapted to these conditions.
A “backbone” refers to the structural plants that form the permanent framework of your garden. These are the perennials, shrubs, and grasses that provide year-round interest and stability. For chalky soil, this backbone must be composed of species that thrive in low-water, high-alkaline environments. Think of the flora of the Mediterranean or dry prairies. Plants like Lavender, Rosemary, Russian Sage, Sedums, and Yuccas are excellent choices. Their silvery foliage and tough nature are evolutionary adaptations to these exact conditions.
Ornamental grasses like Blue Fescue (Festuca glauca) or Feather Reed Grass (Calamagrostis) also provide beautiful texture and movement while requiring very little water once established. These plants form the resilient core of the garden. They are the ‘survivors’ that will look good even in a hot, dry summer, reducing your workload and water bill.
However, establishing this backbone doesn’t mean you can’t grow other plants. The crucial step is intensive soil amendment *before* planting. The single most important thing you can do for chalky soil is to incorporate massive amounts of organic matter. Adding several inches of well-rotted compost, leaf mold, or manure will drastically improve water retention, add vital nutrients, and slightly moderate the pH over time. This creates pockets of richer soil where less drought-tolerant plants can be grown amongst the tough backbone species, creating a diverse and beautiful garden that respects the underlying nature of your soil.
Key takeaways
- Observe Before You Act: The most critical step is to understand your site’s unique patterns of sun, wind, and water before implementing any design.
- Demand Multiple Functions: Make every element in your garden, from a path to a plant, serve at least two or three purposes to maximize efficiency.
- Value the Edges: Increase your garden’s productivity by designing with curves, keyholes, and spirals to maximize the highly fertile “edge” zones.
Creating Self-Sustaining Ecosystems: How to Stop Buying Compost and Fertilizer?
The ultimate goal of a permaculture garden is to create a closed-loop system—a managed ecosystem that generates its own fertility, freeing you from the need to constantly import bags of compost and bottles of fertilizer. This might sound complex, but it boils down to a simple idea: growing your own mulch and nutrients right where you need them. This creates a truly self-sustaining and low-maintenance garden.
The first strategy is to incorporate “nitrogen-fixing” plants. Legumes—like clover, beans, peas, and lupins—have a remarkable relationship with bacteria on their roots that allows them to pull nitrogen gas from the atmosphere and convert it into a form that plants can use. Interplanting legumes throughout your garden beds or using a cover crop of clover on a fallow bed is like setting up tiny, on-site fertilizer factories that continuously enrich your soil for free.
The second, and equally powerful, strategy is to grow dedicated “mulch plants.” These are fast-growing plants grown specifically to be cut down and used as a green mulch, a technique known as ‘chop and drop.’ This process returns organic matter and nutrients directly to the soil surface, where they decompose and feed the soil life, which in turn feeds your plants.
- Comfrey: A classic permaculture plant, comfrey has a deep taproot that “mines” nutrients from deep in the subsoil and brings them up into its leaves. It can be chopped down several times a year to provide a rich, nutrient-dense mulch.
- Lamb’s Quarters: Often considered a weed, this plant produces abundant foliage that is excellent for chop and drop.
- Sunroots (Jerusalem Artichokes): These vigorous plants produce tall stalks and leaves that can be chopped down in late summer to mulch your beds for the winter.
By dedicating a small portion of your garden to these powerhouse plants, you are creating a self-renewing source of fertility. This closes the loop, turning your garden from a system that consumes resources into one that generates them.
Your journey to a more resilient, beautiful, and productive garden doesn’t require a radical overhaul. It starts with one simple, powerful step: observation. Begin today by applying the principles we’ve discussed to truly see your space, and you’ll unlock the blueprint for a smarter, more sustainable suburban oasis.