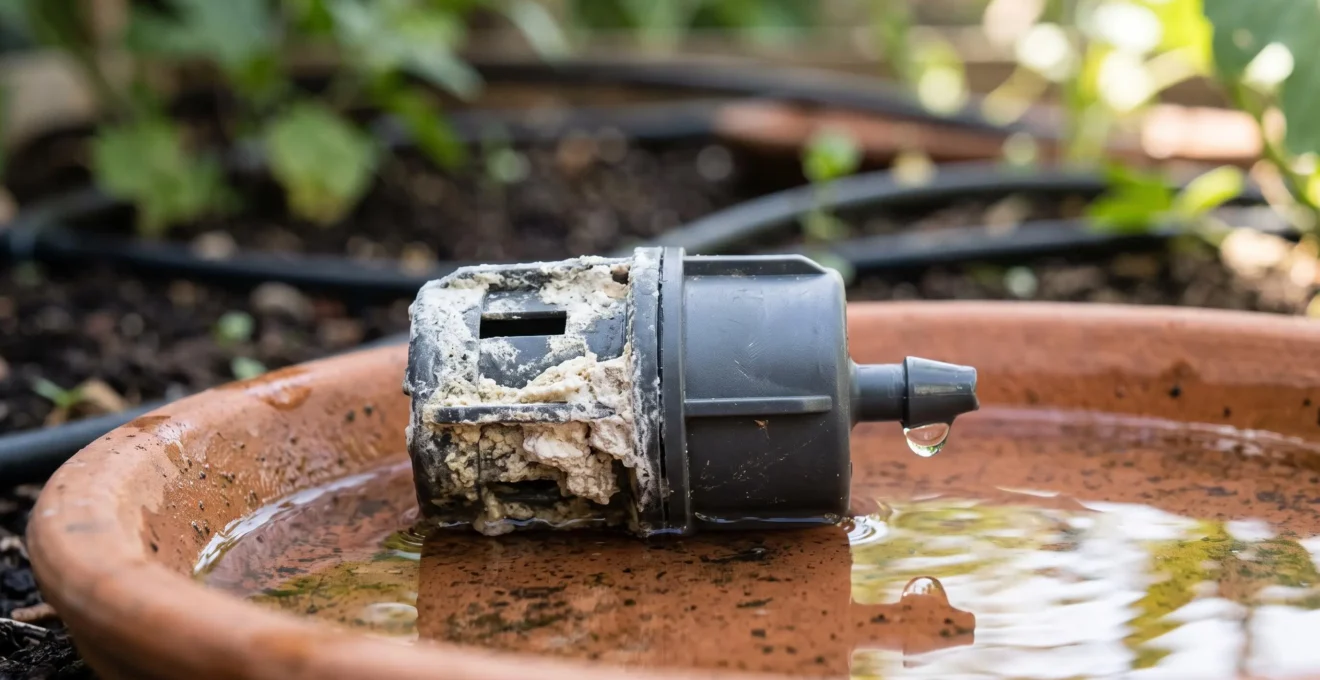
In summary:
- Persistent clogging in hard water areas is best solved by dissolving limescale with a mild acid like citric acid, not just vinegar.
- Prevent blockages by installing filters, flushing lines regularly, and choosing “take-apart” emitters designed for maintenance.
- Understand the engineering of different emitters; turbulent flow and pressure-compensating models handle debris better but aren’t immune to mineral buildup.
- Diagnose the clog type—mineral, insect, or root—before acting, as the solution for each is different.
- Ensure your system is compliant with UK hosepipe ban exemptions by using a timer and pressure reducer, delivering water directly to the soil.
For any gardener in London or the South East, the chalky residue left in a kettle is a familiar sight. This same mineral-rich hard water is flowing through your drip irrigation system, and the consequences are far more frustrating than a slow-boiling cup of tea. Emitters sputter, plants wilt, and a system designed to save time and water becomes a source of constant maintenance. The common advice is often to flush the lines or soak the heads in vinegar, but these are often temporary fixes, not permanent solutions.
This approach treats the symptom—the clog—without diagnosing the root cause. A maintenance engineer wouldn’t just hit a machine with a hammer; they would analyse the failure point, understand the material science, and implement a preventative maintenance schedule. What if we applied the same diagnostic mindset to our gardens? The key to a reliable drip system in hard water areas isn’t just about cleaning; it’s about understanding the specific type of blockage, selecting the right hardware, and adopting a systematic approach to maintenance.
This guide provides that engineer’s perspective. We will move beyond simple cleaning tips to explore the science of descaling, the mechanical differences between emitter types, and the strategic methods required to build a resilient system that not only survives but thrives in challenging water conditions—and even complies with UK hosepipe bans.
To navigate this complex topic effectively, this guide is structured to take you from immediate problem-solving to long-term strategic planning. Explore the sections below to master every aspect of drip irrigation maintenance.
Summary: A Diagnostic Guide to Drip Emitter Maintenance
- Vinegar or Acid: Safe Ways to Dissolve Limescale in Emitters?
- Turbulent Flow Emitters: Do They Really Prevent Clogging?
- The Earwig Problem: Why Insects Block Emitters and How to Stop It?
- How to Drain Emitters to Prevent Frost Damage Splitting?
- 2L/h or 4L/h: Matching Emitter Flow to Pot Volume?
- The Bucket Test: How Fast Should Water Drain for Lavender?
- Soaker Hose or Drippers: Which Wastes Less Water in Borders?
- Strategic Drip Irrigation Methods to Survive UK Hosepipe Bans
Vinegar or Acid: Safe Ways to Dissolve Limescale in Emitters?
When an emitter is blocked by limescale (calcium carbonate), simply flushing it with water is ineffective. A chemical reaction is needed to break down the mineral deposit. While household vinegar (acetic acid) can work on light scaling, a more targeted approach is often required for the stubborn buildup caused by very hard water. For a more effective and controlled solution, many maintenance professionals turn to a different, widely available tool. As Jess Thomas of Drainage Central notes, “Citric acid is effective at removing limescale as it dissolves the mineral deposits.” A weak solution of citric acid can be flushed through the system or used as a soak for detached emitters, breaking down the calcium without damaging the plastic components.
The key to this process is dissolution. The acid reacts with the alkaline calcium carbonate, converting it into a soluble salt that can be easily flushed away. This chemical cleaning is a core part of a robust maintenance schedule, but it should be a periodic intervention, not a constant battle.
As you can see in the micro-view, the acid creates tiny bubbles as it works, physically lifting and chemically dissolving the mineral crust from the internal flow paths. However, the most effective strategy is always prevention. By implementing a few key engineering controls, you can dramatically reduce the rate of limescale formation and the frequency of required chemical cleanings. These preventative measures form the foundation of a low-maintenance, high-reliability irrigation system.
Action Plan: Preventing and Clearing Emitter Clogs
- Install Filtration: Use filters at the head of the irrigation system to catch mineral particles, sand, and organic debris before they can enter and settle in the lines.
- Perform Regular Flushes: Periodically remove end caps or open flush valves and let water run at full pressure for several minutes to clear out any accumulated sediment.
- Automate Flushing: Upgrade end caps to automatic flush valves. These devices purge the line of debris for a few seconds each time the system turns on or off, preventing sediment from settling.
- Choose Cleanable Hardware: Prioritise “take-apart” or cleanable emitters. These models have a removable cap, allowing direct access to the internal labyrinth for manual descaling in hard water conditions.
- Implement a Descaling Schedule: Based on your water hardness, schedule a periodic flush with a mild citric acid solution (e.g., quarterly or bi-annually) to dissolve early-stage mineral buildup before it becomes a major blockage.
Turbulent Flow Emitters: Do They Really Prevent Clogging?
The term “self-cleaning” is often used in marketing, but the reality lies in clever hydraulic engineering. An emitter’s resistance to clogging is fundamentally determined by the geometry of its internal flow path. Emitters aren’t just simple holes; they contain a precisely moulded labyrinth or channel designed to reduce the high pressure from the main line down to a slow, controlled drip. The design of this path dictates how well it can handle suspended particles. Turbulent flow emitters force water through a long, complex, zigzagging path. This creates tiny vortices and chaotic flow that keeps fine sediment and algae moving, preventing them from settling and consolidating into a blockage.
However, this is just one piece of the puzzle. More advanced models are pressure-compensating (PC), using a flexible silicone diaphragm that adjusts to maintain a constant flow rate despite variations in line pressure. This diaphragm’s continuous flexing can also help to pass small particles through. A study on the clogging dynamics of PC drippers found that an emitter’s anti-clogging ability depends on its self-cleaning mechanism, flow path geometry, and the type of material in the water. No single design is perfect for all types of debris.
The table below, based on an analysis of different emitter mechanisms, breaks down how these engineered solutions work and where their limitations lie. Understanding these differences is key to selecting the right hardware for your specific conditions.
| Mechanism | How It Works | Best Against | Main Limitation |
|---|---|---|---|
| Continuous Turbulent Flow (labyrinth) | Water is forced through a long zigzag path, creating vortices that keep particles moving | Fine sediment, silt, algae in suspension | Less effective against slow mineral precipitation bonding directly to internal walls |
| Pressure-Compensating Diaphragm | A silicone diaphragm continuously flexes with line pressure, allowing small particles to pass through | Variable pressure zones and particulate matter | Diaphragm seal can still be affected by heavy particulate buildup |
| On-off Self-Flushing | Opens a larger channel at the start or end of an irrigation cycle to flush the line | Larger, soft organic debris | Does not continuously prevent settling between flush cycles |
Ultimately, a turbulent flow path is a powerful feature for preventing clogs from suspended particles, but it is less effective against the chemical process of limescale precipitating directly onto the emitter’s internal walls. For hard water, a combination of turbulent flow and a take-apart design for manual descaling offers the most resilient solution.
The Earwig Problem: Why Insects Block Emitters and How to Stop It?
When an emitter fails, it’s easy to assume the culprit is limescale, especially in a hard water area. However, a proper diagnostic approach—what we can call clog forensics—is essential. Before you begin a chemical flush, detach the faulty emitter and inspect the blockage. You might be surprised to find the cause is biological, not mineral. Insects, particularly earwigs and ants, are drawn to the moisture and shelter offered by drip irrigation components. They can crawl into the emitter’s outlet, get trapped, and create a complete physical blockage.
This type of failure requires a mechanical solution, not a chemical one. Attempting to dissolve an insect with acid is futile and unnecessary. The blockage can typically be cleared by simply poking a thin wire into the outlet or, in the case of take-apart emitters, disassembling the unit and rinsing it out. Another common biological issue is root intrusion. Tiny, hair-like roots from nearby plants can be drawn to the consistent moisture source and grow directly into the emitter opening, a problem known as root intrusion.
Visually distinguishing between these failure modes is the first step to an efficient repair. A chalky, white, hard crust is clearly limescale. A dark, organic mass points to an insect or soil debris. Fine, fibrous threads indicate root intrusion. To prevent insect blockages, ensure emitters are not buried in mulch where insects thrive. Some gardeners find that elevating the end of the tubing slightly can deter crawling insects. For root intrusion, the best defence is to use copper-infused or root-guard-treated dripline for subsurface installations, or simply to place emitters away from the most aggressive root systems.
How to Drain Emitters to Prevent Frost Damage Splitting?
A drip irrigation system’s most vulnerable moment is not during a summer drought, but on a freezing winter night. Water expands by approximately 9% when it freezes, exerting immense pressure on whatever contains it. For the delicate plastic components of a drip emitter, this expansion can be catastrophic, leading to hairline cracks or complete splits. A cracked emitter will not drip; it will gush, wasting water and failing to deliver it where needed. This makes winterisation a critical, non-negotiable part of your annual maintenance protocol.
While some heavy-duty tubing is designed to withstand freezing, it’s the emitters and fittings that are the primary failure points. As experts at Orbit Irrigation confirm, while “Drip tubing can remain in place year-round in many climates, draining is recommended in freeze-prone areas.” For most of the UK, this is essential advice. The goal is to remove as much water from the system as possible before the first hard frost.
The process is straightforward. First, shut off the water supply to the irrigation system and detach the pressure regulator and timer from the tap, storing them indoors. If your system has a slope, open the end caps or flush valves at the lowest points and let gravity do the work. For flat layouts, it is highly effective to use a compressor with a low-pressure setting to blow the remaining water out of the lines. This “blow-out” method ensures even the smallest droplets are expelled from the emitter labyrinths, leaving nothing to freeze, expand, and destroy your hardware. This simple, 15-minute task in autumn can save you hours of frustrating repairs and replacements in the spring.
2L/h or 4L/h: Matching Emitter Flow to Pot Volume?
Choosing an emitter isn’t just about clog resistance; it’s about matching the rate of water delivery to the needs of the plant and the capacity of its environment. Emitters are rated by their flow rate in litres per hour (L/h) or gallons per hour (GPH). Common sizes are 2 L/h and 4 L/h. Selecting the right one is a crucial design decision that directly impacts water efficiency and plant health. A low-flow 2 L/h emitter is ideal for smaller pots, containers, or plants in heavy, clay-like soil. It releases water slowly, allowing it to be absorbed deep into the root zone without running off the surface or draining straight through the bottom of a pot. This slow application is perfect for maximising absorption and minimising waste.
Conversely, a high-flow 4 L/h emitter is better suited for larger containers (over 20 litres), thirsty plants like tomatoes, or plants in very free-draining, sandy soil. In these scenarios, a 2 L/h emitter might not deliver a wide enough wetting pattern to saturate the entire root ball during a typical watering cycle. The higher flow rate of a 4 L/h emitter ensures water spreads out more horizontally, covering a larger soil volume more quickly. You can also achieve this by using two 2 L/h emitters spaced apart in a single large pot.
The principle is to apply water no faster than the soil can absorb it. If you see water pooling on the surface around your emitter or running out of the bottom of a pot within minutes of the system turning on, your flow rate is likely too high for the container volume and soil type. The goal is a slow, steady delivery that wets the soil profile evenly. For a 10-litre pot with standard potting mix, a single 2 L/h emitter running for 15-20 minutes is often a good starting point. For a 50-litre pot containing a large shrub, two 4 L/h emitters might be more appropriate.
The Bucket Test: How Fast Should Water Drain for Lavender?
Drip irrigation is about precision, and that precision depends on understanding not just your hardware, but your soil. For drought-tolerant plants like Lavender, Rosemary, or other Mediterranean herbs, the single most common cause of failure is “wet feet” from poor drainage. Before you even install an emitter, you must determine if your soil can handle the water you intend to apply. This is where a simple diagnostic tool, the “bucket test” (a basic percolation test), provides an invaluable engineering metric.
This test measures the rate at which your soil drains. To perform it, dig a hole roughly the size of a standard bucket (about 30cm wide and 30cm deep) in the intended planting area. Fill the hole completely with water and let it drain away entirely. This initial soaking saturates the surrounding soil. Immediately refill the hole with water and use a ruler and a timer to measure how much the water level drops in one hour. This second measurement gives you the true percolation rate.
For a plant like lavender, you are looking for excellent drainage. An ideal rate is a drop of at least 5cm (2 inches) per hour. If the water level drops by less than 2.5cm (1 inch) in an hour, your soil has poor drainage. In this scenario, no amount of careful irrigation will prevent the roots from becoming waterlogged. Your options are to either amend the soil heavily with grit and organic matter to improve its structure, or to plant in raised beds or containers where you have complete control over the growing medium. The bucket test is a critical diagnostic step; it tells you whether your irrigation project is viable or if you need to address fundamental soil engineering first.
Soaker Hose or Drippers: Which Wastes Less Water in Borders?
For watering garden borders, the two main low-volume options are soaker hoses and drip irrigation lines with emitters. While both are vast improvements over a sprinkler, they are not equal from an engineering or efficiency standpoint. A soaker hose is essentially a porous pipe that “weeps” water along its entire length. This is simple, but it has significant drawbacks. The water distribution is often non-uniform, with more water released at the beginning of the hose (closer to the tap) where pressure is highest, and far less at the end. This is known as the “cone effect”.
Drip irrigation, by contrast, uses precisely engineered emitters to deliver a measured amount of water at specific points. When using pressure-compensating (PC) emitters, every dripper on the line delivers the same flow rate, whether it’s the first or the last. This ensures uniform watering for every plant along the border. The efficiency gains are significant. According to analysis, drip systems achieve 90-95% water application efficiency, as almost no water is lost to evaporation or runoff. Soaker hoses, which often wet the soil surface more broadly, typically operate at a lower 70-80% efficiency.
The differences in long-term performance and maintainability are even more stark, as the following comparison based on data from long-term use shows:
| Criteria | Soaker Hose | Drip Emitters |
|---|---|---|
| Water application efficiency | 70-80% | 90-95% |
| Uniformity over line length | Cone effect: up to 2-3x more water in the first 10 feet than the last 10 feet | Pressure-compensating, consistent flow from start to end |
| Maintainability of a clog | A clogged section compromises the entire hose and is often irreparable | Individual emitters can be cleaned or replaced one by one |
| Typical lifespan | 1-3 years | 5-15 years with maintenance |
From a maintenance engineer’s perspective, the choice is clear. A soaker hose is a low-cost but short-term and inefficient solution. A drip irrigation system is a long-term investment in precision, efficiency, and maintainability. A single clog in a soaker hose can render the entire length useless, whereas a clogged drip emitter is an inexpensive and easily replaceable component.
Key Takeaways
- In hard water areas, limescale is the primary but not only cause of clogs; insects and roots are common culprits requiring different solutions.
- Systematic prevention—using filters, regular flushing, and choosing take-apart emitters—is more effective than reactive cleaning.
- A well-designed drip system using pressure-compensating emitters is significantly more water-efficient (90-95%) and longer-lasting than a soaker hose.
Strategic Drip Irrigation Methods to Survive UK Hosepipe Bans
During periods of drought, a hosepipe ban (officially a Temporary Use Ban) can feel like a death sentence for a garden. However, these regulations are not a blanket ban on watering. They are designed to prohibit inefficient water use, and a properly configured drip irrigation system is specifically recognised as an efficient method. This makes it exempt from the restrictions, provided it meets certain technical criteria. This is not a loophole; it is a deliberate provision to encourage water-wise technology.
The rules are precise. According to water companies like Thames Water, an exempt system is one where water is delivered directly to the soil, avoiding waste through evaporation or runoff. Their guidance states an exempt system “must be fitted with a pressure reducing valve and a timer, that are not handheld. They must place water drip by drip directly onto or beneath the soil surface.” This definition perfectly describes a standard automated drip irrigation setup.
To ensure your system is “hosepipe-ban ready,” you must have two key components installed between your tap and your main supply line: a pressure reducer and a water timer. The pressure reducer is vital for the system’s health, preventing emitters from being blown out by high mains pressure. The timer is what makes the system automated and therefore compliant. Simply hand-watering with a drip line attached to a hose is not exempt. Furthermore, to fully comply with the spirit of the law, drip lines should be laid on the soil surface under a layer of mulch, or you should use subsurface dripline to ensure absolutely no water is dispersed into the air. By investing in this hardware, your drip system transforms from a convenience into a vital, legally-compliant tool for garden survival during a drought.
By moving from a reactive cleaning mindset to one of proactive engineering and diagnostics, you can build a drip irrigation system that is not only reliable and efficient but also resilient enough to withstand hard water, seasonal challenges, and regulatory restrictions. Begin today by auditing your current system and implementing these strategies for long-term success.