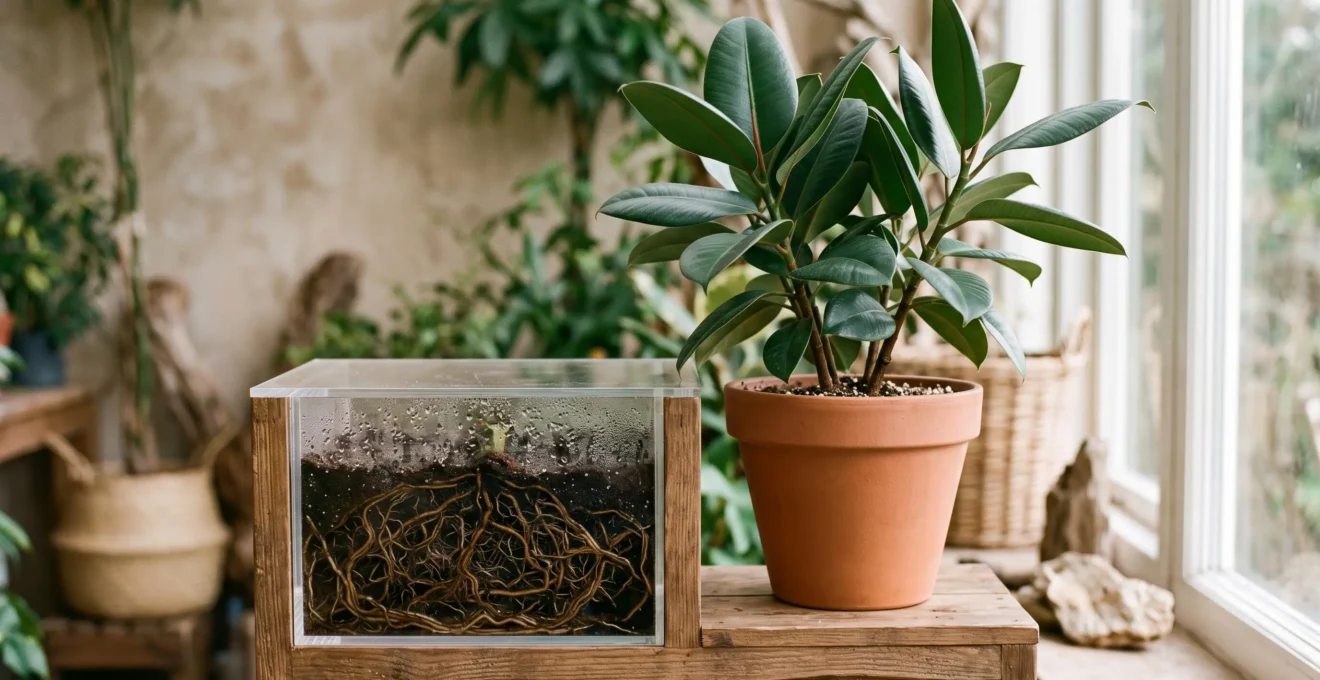
Contrary to popular belief, a yellow leaf is not a warning sign; it’s a final cry for help from a plant whose real problems started weeks ago at the roots.
- Most visual cues on leaves, like chlorosis or spots, are lagging indicators of an established issue in the soil.
- A forensic approach—using sight, touch, and even smell—can detect root stress long before it becomes fatal.
Recommendation: Shift your focus from treating leaf symptoms to diagnosing the root-level environment to truly understand and improve your plant’s health.
For most gardeners, the first sign of trouble is a yellowing leaf. It triggers a familiar, panicked checklist: too much water, not enough water, maybe it needs fertilizer? This reaction, while common, is fundamentally flawed. It treats the symptom, not the cause. By the time a leaf turns yellow, wilts, or develops spots, the underlying condition—often originating in the root zone—has been festering for days or even weeks. This delay between the root-level event and the visible symptom is the critical window where a plant’s fate is decided.
Relying on leaf health alone is like trying to understand a building’s structural integrity by only looking at the paint. A truly effective plant health assessment is a forensic investigation. It requires you to look past the obvious and search for the subtle, early-warning clues that broadcast from the soil and the base of the plant. This approach demands a shift in perspective: from a reactive gardener to a proactive plant diagnostician who understands that the leaves are often the last to know what’s really going on.
This guide will equip you with the diagnostic skills to interpret these early signals. We will move from the obvious leaf symptoms to the subtle indicators of root stress, exploring how to read nutrient patterns, differentiate pests from fungus, perform non-destructive root checks, and even use your sense of smell as a diagnostic tool. By learning to read the whole plant, you can intervene when it matters most—before the damage becomes irreversible.
To help you master this diagnostic approach, this article is structured to build your investigative skills. We will begin by decoding the messages hidden in leaf patterns and then move deeper into the plant’s system to uncover the root causes of distress, providing you with the knowledge to act decisively and effectively.
Summary: A Forensic Guide to Early Plant Stress Detection
- Veins or Margins: What Chlorosis Patterns Tell You About Nutrients?
- Holes or Spots: Distinguishing Insect Damage From Fungal Infection?
- The Silent Carrier: Why Healthy-Looking Plants Spread Viruses?
- How to Check Roots Without Killing the Plant?
- When to Spray: The Biological Window for Nematode Effectiveness
- The pH Lock-Out: Why Adding More Manure Won’t Fix Yellow Leaves?
- The Sniff Test: What Does Healthy Soil Smell Like vs Rot?
- Preventing Fatal Root Rot: The Hydrogen Peroxide Rescue Technique
Veins or Margins: What Chlorosis Patterns Tell You About Nutrients?
Yellowing leaves, or chlorosis, is the most frequently cited plant problem, but it’s a generic symptom. Treating it without a proper diagnosis is a gamble. The key is not that the leaf is yellow, but how it is yellow. The specific pattern of yellowing is a crucial piece of forensic evidence. For example, interveinal chlorosis—where the leaf tissue between the veins turns yellow while the veins themselves remain green—is a classic sign of iron deficiency. This doesn’t necessarily mean there’s no iron in the soil. More often, it indicates a root-level problem preventing the plant from absorbing it.
This is frequently caused by a high soil pH. As research from LSU AgCenter shows, when the soil pH rises above 7.0, iron becomes chemically unavailable to the plant’s roots, creating a “lock-out” situation. A controlled study on grapevine rootstocks demonstrated this symptomatic lag perfectly: significant interveinal chlorosis appeared on new growth just two weeks after being placed in an iron-deprived solution. The most susceptible plants experienced a 75% drop in chlorophyll concentration, showing how rapidly a root-level blockage translates into visible decay. Conversely, chlorosis that starts at the leaf margins or tips and moves inward points toward mobile nutrient deficiencies like nitrogen or magnesium, which the plant pulls from older leaves to support new growth.
Observing these patterns allows you to move beyond simply seeing “a yellow leaf” and start diagnosing the specific environmental or nutritional imbalance at the root. It’s the difference between saying someone has a fever and identifying the specific infection causing it.
Holes or Spots: Distinguishing Insect Damage From Fungal Infection?
When leaves show physical damage like holes or spots, the immediate assumption is an attack by a visible pest or a fungal disease. However, these are often secondary infections preying on a plant already weakened by an invisible, underlying stressor at the root level. A good diagnostician must ask: is this the cause of the problem, or a symptom of a deeper vulnerability? The evidence lies in the nature of the damage. Chewing insects, like caterpillars, leave behind irregular holes and ragged edges. Sucking insects, like aphids, are more subtle, causing stippling, leaf curl, and a sticky residue known as honeydew.
In contrast, fungal spots often present with a more uniform or target-like appearance, sometimes with a yellow halo around the lesion. These pathogens, like those causing root rot, thrive in overly moist, poorly aerated soil. The presence of fungus gnats, for instance, is a major red flag for root health. While the tiny adult flies are a nuisance, the real damage is done by their larvae in the soil, which feed on root hairs and create entry points for pathogens. As Clemson University’s Land-Grant Press explains, a single female can lay up to 200 eggs, and the entire life cycle can complete in just 18 days, leading to a rapid explosion of root damage. This pest pressure is a signal that the soil environment is compromised.
A 2023 review of plant defense systems further supports this, describing how plants under attack release volatile organic compounds to signal distress. Therefore, significant pest or disease presence is not just a surface problem; it is a chemical scream from a plant whose foundational defenses, anchored in a healthy root system, are failing.
The Silent Carrier: Why Healthy-Looking Plants Spread Viruses?
Perhaps the most challenging diagnostic scenario is the silent carrier—a plant that appears vigorous and perfectly healthy but is systemically infected with a virus. Unlike fungal spots or insect damage, viral infections often do not present immediate, obvious symptoms. The plant can act as a Trojan horse, looking pristine while actively spreading pathogens to its neighbors, often via sucking insects like aphids that act as vectors. This phenomenon is the ultimate proof that relying on visual leaf health is a flawed strategy.
A plant can be a silent carrier for several reasons. Some viruses have long incubation periods, while some plants possess a tolerance that allows them to harbor the virus without showing severe symptoms. They may exhibit only subtle signs that are easily missed, such as a slight mosaic pattern on the leaves, faint mottling, or a marginal reduction in growth rate that would only be noticeable when compared to a truly healthy specimen. Without that side-by-side comparison, the plant passes as “healthy” to the untrained eye.
The danger is that the underlying condition is still present and transmissible. The virus is replicating within the plant’s cells, placing it under constant systemic stress and making it more susceptible to secondary issues. When you introduce a new plant to your garden, you are not just introducing a single organism; you are introducing its entire microbiome and any hidden pathogens it may carry. This is why proper quarantine procedures for new acquisitions are a non-negotiable part of responsible gardening. It acknowledges the forensic reality that what you see is not always what you get.
How to Check Roots Without Killing the Plant?
Given that most critical plant problems begin underground, the need to inspect the roots is clear. Yet many gardeners hesitate, fearing that unpotting a plant will cause fatal shock. While a full root autopsy is sometimes necessary for a severely distressed plant, there are several non-invasive or minimally invasive techniques you can use for a preliminary diagnosis. These methods rely on engaging all your senses to gather evidence from the root zone environment.
The first step is a gentle probe. Instead of uprooting the entire plant, you can use a thin wooden skewer or dowel to perform a “core sample.” Gently insert the skewer deep into the soil near the edge of the pot, leave it for a minute, and then pull it out. Does it come out sopping wet? The soil is likely waterlogged. Does it have dry, crumbly soil clinging to it? The plant may be underwatered. This simple test gives you direct information about the moisture level deep within the root ball, where problems begin. Another technique is the “stem squeeze.” Gently pinch the base of the plant’s main stem right at the soil line. It should feel firm and solid. A soft, squishy, or hollow feeling is a definitive sign of advanced rot that has moved from the roots into the plant’s crown.
These tactile clues, combined with visual signs on the soil surface like mildew or mushrooms, create a more complete picture of the subterranean environment. This systematic check-up is the foundation of proactive plant care.
Action Plan: Your 5-Step Root Health Audit
- Initial Visual Sweep: Examine the leaves. Look beyond simple yellowing for early, subtle signs like slight curling or drooping at the edges, which often precede a full wilt.
- Soil Surface Analysis: Inspect the top layer of soil. Note the presence of a white, powdery film of mildew, the emergence of small mushrooms, or a population of fungus gnats. These all indicate excessive, prolonged moisture.
- Sensory & Tactile Check: Smell the soil—does it have a fresh, earthy scent or a musty, sour odor? Gently squeeze the base of the main stem—is it firm and solid, or does it feel soft and spongy?
- Correlate the Evidence: Connect your findings. Do the curling leaves (Step 1) correspond with a musty smell (Step 3)? Does the presence of fungus gnats (Step 2) align with dark spotting on the leaves?
- Formulate a Hypothesis: Based on the collected evidence, form a preliminary diagnosis. The clues point toward either a moisture-management issue (root rot), a pest infestation at the root level, or a nutrient problem.
When to Spray: The Biological Window for Nematode Effectiveness
Once you’ve diagnosed a root-level problem like fungus gnat larvae, the impulse may be to drench the soil with a chemical pesticide. However, a more precise, forensic approach involves deploying a biological agent that targets the pest within its specific life cycle. This is where understanding the concept of a “biological window” becomes critical. It refers to the specific set of environmental conditions and timing required for a biological control, like entomopathogenic nematodes, to be effective.
Nematodes are microscopic roundworms that hunt and kill soil-dwelling pests, including fungus gnat larvae. However, they are not a “spray and forget” solution. They are living organisms that require specific conditions to survive and work. The soil must be moist (but not waterlogged) and within a specific temperature range, typically between 12-30°C (54-86°F). Applying them to dry soil or during a heatwave is a waste of time and money, as the nematodes will die before they can establish a population and find their prey.
The successful use of nematodes is itself a diagnostic confirmation. As outlined in the University of California’s official pest management guidelines, applying *Steinernema feltiae* nematodes via a drench or irrigation can effectively control fungus gnat populations. If you apply nematodes under the correct conditions and subsequently see a decline in the gnat population and an improvement in plant health, you have retroactively confirmed that root-damaging larvae were indeed a significant part of the initial problem. This is a perfect example of using a treatment as the final step in the diagnostic process.
The pH Lock-Out: Why Adding More Manure Won’t Fix Yellow Leaves?
A common gardener’s instinct when faced with pale or yellowing leaves is to “feed the plant.” This often involves adding nutrient-rich amendments like manure or compost. While well-intentioned, this action can be completely ineffective—or even harmful—if the underlying problem is not a lack of nutrients in the soil, but a pH-induced nutrient lockout. This is a classic case where a forensic diagnosis prevents a counterproductive treatment.
Nutrient lockout occurs when the soil chemistry prevents a plant’s roots from absorbing nutrients that are physically present in the soil. The most common culprit is an improper pH level. Most plants thrive in a slightly acidic to neutral pH range (around 6.0 to 7.0). When the soil becomes too alkaline (pH above 7.0), essential micronutrients like iron and manganese become insoluble. They are locked up in a chemical form that the plant’s roots simply cannot take in, no matter how much is available.
Adding more organic matter like manure, which can be alkaline itself, can exacerbate the problem. You are adding more iron to a vault that the plant can’t open. The evidence of this problem is often documented in agricultural science. For instance, soil analyses frequently show that issues arise in soils with a pH above 7.0 combined with high carbonates, which actively bind to micronutrients. The correct course of action is not to add more fertilizer, but to first test the soil pH and then amend it to bring it back into the optimal range for nutrient absorption. This might involve adding acidifying agents like elemental sulfur or sphagnum peat moss. Only then will the nutrients already present in the soil—and any you add—become available to the plant.
The Sniff Test: What Does Healthy Soil Smell Like vs Rot?
Of all the diagnostic tools at your disposal, one of the most powerful and most overlooked is your sense of smell. The aroma of the soil is a direct indicator of the microbiological activity within it. Healthy, well-aerated soil has a distinctively pleasant, earthy smell. This scent, known as geosmin, is produced by actinobacteria, a type of beneficial microbe that signals a thriving, balanced soil ecosystem. It’s the smell of a forest floor after rain—a sign of life and decomposition in its proper form.
In stark contrast, soil suffering from root rot has a completely different aromatic profile. When soil becomes waterlogged, the air pockets that aerobic (oxygen-loving) microbes need to survive are filled with water. This creates an anaerobic environment where different, less desirable microbes take over. These anaerobic bacteria produce byproducts like hydrogen sulfide as they decompose organic matter, resulting in a sour, musty, or swampy odor often compared to rotten eggs or a stagnant pond. This smell is an unambiguous alarm bell. It tells you that the root environment is suffocating and pathogenic activity is underway.
This sensory clue is often one of the earliest and most reliable indicators of root rot, appearing long before the leaves show severe signs of distress. As one houseplant expert describes when diagnosing a ficus:
A houseplant care educator describes checking a ficus suffering from root rot and noting a distinct musty, unpleasant odor coming from the wet soil, which subsided only once the soil was allowed to dry out as part of the recovery process.
Trusting your nose can give you a critical head start in saving a plant. If you pick up a pot and the smell is off, it’s time to investigate further, regardless of how green the leaves look.
Key Takeaways
- Leaf symptoms like yellowing are lagging indicators; the real problem almost always starts at the roots.
- A forensic approach using patterns (chlorosis), context (pests vs. fungus), and senses (smell, touch) is crucial for early diagnosis.
- Environmental factors like soil pH and moisture level are more often the culprit than a simple lack of nutrients.
Preventing Fatal Root Rot: The Hydrogen Peroxide Rescue Technique
When a forensic examination confirms your worst fears—advanced root rot, characterized by dark, mushy roots and a foul odor—it’s time for an emergency intervention. This is the plant equivalent of surgery, where the goal is to remove the diseased tissue and create a sterile environment for recovery. While many fungicides exist, a common and effective household remedy involves using a dilute hydrogen peroxide solution. Hydrogen peroxide (H₂O₂) releases an extra oxygen atom when it breaks down in soil, which serves two critical functions: it kills off the anaerobic bacteria and fungal pathogens causing the rot, and it helps aerate the compacted, waterlogged soil, creating a less hospitable environment for their return.
The rescue procedure is methodical. First, gently remove the plant from its pot and wash away the old soil to fully expose the root ball. Using sterilized pruning shears, you must perform a root autopsy, methodically cutting away every brown, soft, or foul-smelling root. Be ruthless; any infected tissue left behind can cause the rot to return. After trimming the roots, it’s often wise to prune back a proportional amount of the plant’s foliage. The reduced root system can no longer support a full canopy, and this rebalancing reduces stress. It’s also critical to dispose of the contaminated soil and thoroughly sterilize the pot with a bleach solution before replanting in fresh, well-draining potting mix.
A soil drench with a dilute solution of 3% hydrogen peroxide (typically one part peroxide to two parts water) can be used after repotting to help kill any remaining pathogens and provide that crucial burst of oxygen. However, this is an aggressive treatment for a plant already in shock. As experts often caution, chemical interventions should be handled with care. The editorial staff at MasterClass provides a clear warning:
Be careful with chemical treatments and fungicides.
– MasterClass Editorial Staff, MasterClass — Root Rot and Houseplants: How to Prevent and Treat Root Rot
The primary goal should always be prevention through proper watering and well-aerated soil. This rescue technique is a last resort, but when performed correctly, it can bring a plant back from the brink of death.
By adopting this forensic mindset, you shift from being a passive caretaker to an active diagnostician. Start today by observing your plants not just for their beauty, but for the subtle evidence they provide, and you will build a more resilient and thriving garden.