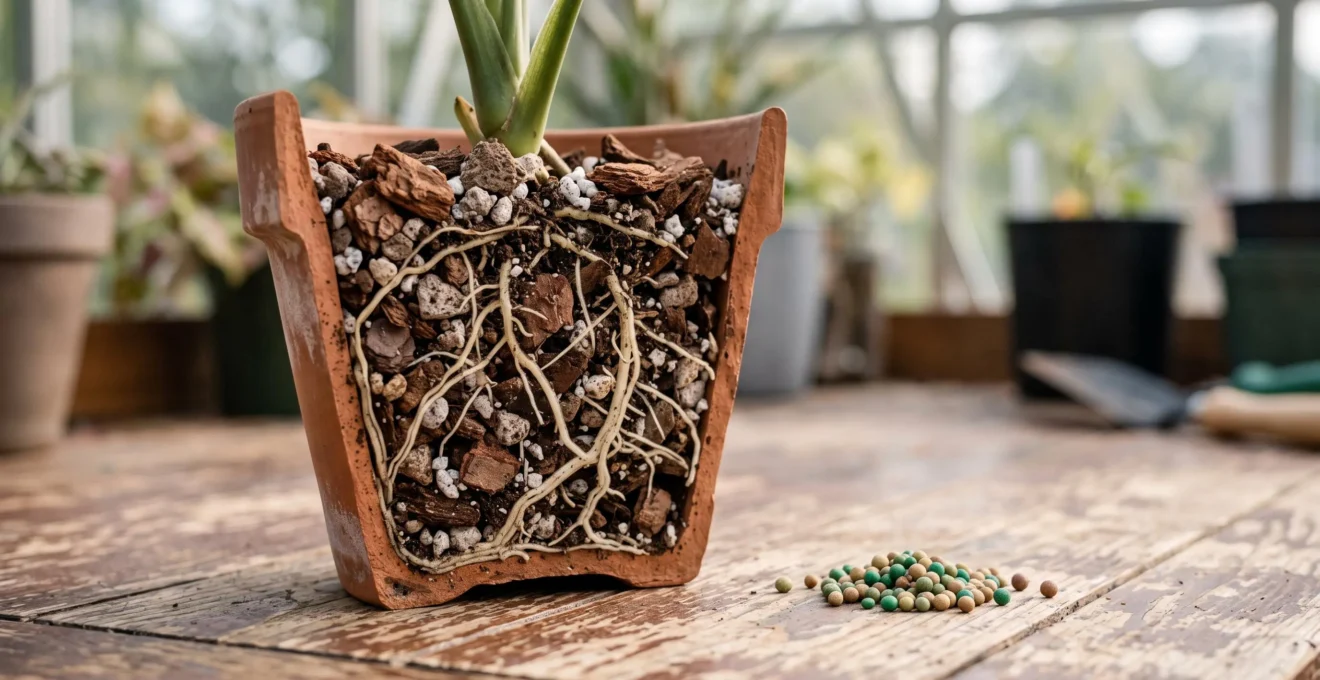
The primary cause of container plant failure is not starvation but suffocation, making substrate porosity a more critical factor for success than fertilizer application.
- Most potting mixes degrade within months, losing the air-filled porosity essential for root respiration, leading to anaerobic conditions and root rot.
- Common practices, like using decorative cover pots or adding a “drainage layer” of gravel, actively worsen the problem by creating a perched water table.
Recommendation: Shift your focus from feeding the plant to engineering the root environment. Measure your substrate’s air-filled porosity and amend it to ensure roots have constant access to oxygen.
For the dedicated container gardener, there is no greater frustration than watching a cherished plant yellow and decline despite a faithful regimen of watering and feeding. You provide the best fertilizer, you monitor moisture levels, and yet, the plant fails. The common diagnosis is often a vague “overwatering,” but this is merely a symptom. The true culprit is a fundamental misunderstanding of a pot’s internal environment. We are conditioned to think of soil as a source of nutrition, a pantry for our plants. Consequently, we focus on what we add to it: nutrients and water.
This perspective is flawed. The primary function of a container substrate is not to feed, but to provide a stable, structured habitat for roots. Within this habitat, the most critical and often overlooked element is gas exchange. Plant roots respire; they require oxygen to function, absorb nutrients, and drive growth. When a substrate becomes waterlogged and compacted, the air-filled pores disappear, creating an anaerobic environment. In this state, roots don’t just stop growing—they begin to die, suffocating long before they have a chance to starve.
But what if the key to thriving container plants wasn’t in the fertilizer bottle, but in the physical structure of the substrate itself? This guide deconstructs the science of substrate porosity. We will move beyond generic advice and delve into the physics of water retention, the mechanics of soil compaction, and the engineering principles required to build a potting mix that breathes. You will learn to diagnose your substrate’s health, identify common but fatal potting mistakes, and ultimately understand why ensuring your roots can breathe is far more important than what you feed them.
This article will provide a technical framework for understanding and managing the root zone. We will explore the properties of key amendments, methods for testing your mix, and the science behind common plant failures, equipping you with the expertise to prevent them.
Summary: Deconstructing Substrate Physics for Healthy Roots
- Perlite or Vermiculite: Which Additive Suits Water-Loving Plants?
- The Drainage Test: How to Calculate Air-Filled Porosity in Your Pot?
- The ‘Slump’ Effect: Why Potting Mix Lose Porosity After 6 Months?
- How to Re-Oxygenate Old Potting Soil Without Replacing It?
- Grit to Soil Ratios: The Perfect Mix for UK Succulent Survival?
- The Pot-Bound Trap: When Fibrous Roots Strangle Your Container Plants
- The Decorative Pot Trap: Why Cover Pots Cause 50% of Houseplant Deaths?
- Preventing Fatal Root Rot: The Hydrogen Peroxide Rescue Technique
Perlite or Vermiculite: Which Additive Suits Water-Loving Plants?
When engineering a substrate for moisture-loving plants, the goal is not just to hold water, but to maintain oxygen access even when saturated. This is a function of total porosity and the ratio of air-filled pores to water-filled pores. Perlite and vermiculite are two common amendments used to manage this balance, but they function very differently. Perlite is a form of volcanic glass that is expanded by heat into a lightweight, porous sphere. Its structure is closed-cell, meaning it holds water primarily on its irregular surface, not within the particle itself. Its main contribution is creating durable, large air gaps (macropores) between soil particles.
This structural addition is critical for aeration. Lab analysis confirms that pure perlite demonstrates a mean total porosity of 88.09%, which significantly improves the gas exchange capacity of dense peat or coir-based mixes. Vermiculite, on the other hand, is a mineral that exfoliates into an accordion-like structure. It has a high cation exchange capacity (CEC) and absorbs and holds significant amounts of water and nutrients within its layers. While it does create some porosity, it is far more water-retentive than perlite and can compact when saturated, reducing air space.
For water-loving plants prone to root rot (like many aroids or ferns), perlite is generally the superior choice. It ensures that even in a consistently moist medium, there are stable air pockets preventing anaerobic conditions. Vermiculite is better suited for seed starting or for plants that require high humidity and consistent moisture without being overly sensitive to low-oxygen environments. The key is to match the amendment’s physical properties to the plant’s specific root respiration needs.
The Drainage Test: How to Calculate Air-Filled Porosity in Your Pot?
Air-Filled Porosity (AFP), also known as air porosity, is the single most important metric for determining the health of a container substrate. It represents the percentage of the total soil volume occupied by air after the pot has been fully saturated and allowed to drain freely. This is the oxygen reservoir available to the roots. Without adequate AFP, roots will suffocate. While professional labs measure this precisely, any gardener can perform a simple drainage test to get a reliable estimate of their mix’s AFP and determine if it falls within the healthy range.
Scientific studies have established a general guideline for container plants. It is recommended that air-filled porosity should be at least 10% and generally no more than 25% of the total soil volume for optimal growth. Below 10%, most plants will suffer from a lack of oxygen, leading to root rot. To measure this at home, you can follow a simple procedure:
- Saturate the Mix: Take a pot with drainage holes and a known volume (V_total). Plug the holes and fill it completely with your potting mix. Add water until the mix is fully saturated and water pools on the surface.
- Measure Drained Water: Place the pot over a collection tray, unplug the holes, and let it drain until it stops dripping. The volume of water collected is the drained water volume (V_drained).
- Calculate AFP: The Air-Filled Porosity is the volume of drained water divided by the total volume of the pot, multiplied by 100. (AFP % = (V_drained / V_total) * 100).
This simple test reveals the truth about your potting mix. A result below 10% is a clear indicator that the substrate needs to be amended with materials like perlite or bark to increase the number and size of macropores. It’s a quantitative step towards diagnosing and solving the root cause of “overwatering.”
The ‘Slump’ Effect: Why Potting Mix Lose Porosity After 6 Months?
A fresh bag of high-quality potting mix feels light and airy for a reason. It is engineered with a high percentage of total porosity and a healthy amount of air space. For example, a new substrate composed of peat, perlite, vermiculite, and bark can exhibit a total porosity of 87% with an air space of 16%, which is well within the ideal range for healthy root growth. However, this optimal structure is not permanent. Over a period of just a few months, every container substrate is subject to the ‘slump’ effect—a gradual but significant loss of air-filled porosity due to a combination of physical compaction and biological decomposition.
The organic components of the mix, primarily peat or coir, naturally break down over time. As microorganisms decompose these materials, the particles become smaller and finer. These fine particles then wash down with watering and clog the large macropores that are essential for air circulation. This process is accelerated by physical forces. Every time you water, the weight of the water compresses the medium. Even the simple act of a plant’s growing root system can contribute to this compaction. The result is a decrease in total volume, an increase in bulk density, and a critical reduction in AFP.
Case Study: How Compaction Destroys Air Pores
The degradation of air porosity is not just a theoretical concept; it’s a measurable physical process. Processing methods and handling can inflict initial damage. Over-processing peat can damage its fibrous structure, while excessive handling can crush brittle perlite particles. These actions create fine dust and small fragments that immediately begin to clog the substrate’s macropores. This initial damage is compounded by compaction over time. When a medium is pressed down firmly at planting or when filled pots are stacked for transport, the large air spaces between particles are crushed. This physical compression systematically decreases the presence of macropores and increases the substrate’s bulk density, effectively suffocating the future root system before it even has a chance to establish.
This ‘slump’ effect is why repotting is not just about giving a plant more room; it’s about refreshing a degraded, suffocating root environment. After 6 to 12 months, most standard potting mixes have lost enough air-filled porosity to become detrimental to plant health, turning a once-ideal habitat into an anaerobic trap.
How to Re-Oxygenate Old Potting Soil Without Replacing It?
When a potting mix has compacted and lost its air-filled porosity, the most common advice is to discard it and repot with a fresh medium. While this is often the best solution, it is not always practical or desirable. It is possible to re-oxygenate and rejuvenate an old substrate by physically reintroducing macropores, the large air channels essential for root respiration. This process is less about adding nutrients and more about architectural restoration. The goal is to break up the compacted fine particles and create a more open, aerated structure.
The most effective method is to amend the existing soil with large, stable, porous inorganic materials. As horticulturist Robert Pavlis notes, the physics are straightforward:
You can decrease the perched water table in any soil by increasing the average particle size — adding sand, perlite, or vermiculite to most potting soil will accomplish this, but the key is to mix it in with the soil, not to lay it at the bottom of the pot.
– Robert Pavlis, GardenMyths.com
To do this, carefully remove the plant from its pot. Gently break up the compacted root ball and soil. In a separate container, mix the old soil with a generous amount of coarse perlite, small orchid bark, or pumice (a 2:1 or even 1:1 ratio of old soil to amendment can be effective). This physically separates the fine particles and creates a network of durable macropores. The impact of such artificial macropores is scientifically validated; one study found that their introduction into a poorly aerated soil led to a 108% increase in root length density. This revitalization process effectively re-engineers the old soil, restoring its ability to hold both water and, crucially, oxygen.
Grit to Soil Ratios: The Perfect Mix for UK Succulent Survival?
Succulents and cacti are frequently victims of root rot, especially in temperate, humid climates where a water-retentive potting mix can remain saturated for extended periods. Their survival hinges on a substrate that drains almost instantly, ensuring the roots are never sitting in stagnant water. The key to achieving this is to create a mix with extremely high air-filled porosity (AFP) by incorporating a large percentage of inorganic grit. The question for many growers is finding the perfect ratio.
There is no single “perfect” mix, as the ideal ratio depends on the specific plant, pot size, and local conditions (e.g., indoor vs. outdoor). However, a reliable starting point for most succulents in a climate with cool, wet seasons is a 50:50 ratio of inorganic grit to organic soil. For more sensitive species or for growers who tend to overwater, a 60:40 or even 70:30 ratio of grit to soil may be necessary. The “grit” component should consist of materials like horticultural grit, pumice, or coarse perlite. These materials create large, stable macropores that do not hold water, allowing for rapid drainage and excellent gas exchange.
The “soil” component provides some moisture and nutrient retention and can be a standard cactus potting mix or a blend of peat/coir and compost. The principle is to provide just enough organic matter to support the plant during its growing season, while the high proportion of grit ensures the substrate dries out quickly and remains well-aerated during dormant or cool periods, preventing the anaerobic conditions that cause rot. Adjusting this ratio is a matter of observation: if your mix stays wet for more than a few days after watering, increase the proportion of grit.
The Pot-Bound Trap: When Fibrous Roots Strangle Your Container Plants
A plant becoming “pot-bound” or “root-bound” is more than just an issue of space; it is a critical failure of the substrate system that leads to self-strangulation. As a plant grows in a confined container, its roots eventually hit the pot walls. Instead of branching out, they are forced to circle along the perimeter. Over time, these circling roots form a dense, tightly woven mat. This mat becomes a physical barrier that fundamentally alters the pot’s hydrology and aeration, creating a deadly trap even if the initial potting mix was perfect.
The primary danger of this dense root mat is its effect on water. The mass of roots can become so compact that it repels water, a condition known as hydrophobia. Water applied to the surface will simply run down the inside walls of the pot and out the drainage hole, leaving the central root ball completely dry. Conversely, in other cases, the mat can act like a sponge, holding an excessive amount of water and creating a localized zone of suffocation right where the roots are most concentrated. Furthermore, the circling roots begin to girdle each other, constricting the flow of water and nutrients and effectively strangling the plant from the bottom up.
Signs of a pot-bound plant include stunted growth, rapid wilting between waterings, and roots visibly emerging from drainage holes. The solution requires physical intervention. The plant must be unpotted, and the root ball must be “pruned.” This involves making several vertical slices into the sides of the root mat with a clean knife and teasing apart the tightly wound roots at the bottom. This action breaks the circling pattern and encourages new roots to grow outwards into the fresh soil of a larger pot, escaping the pot-bound trap.
The Decorative Pot Trap: Why Cover Pots Cause 50% of Houseplant Deaths?
The decorative cachepot, or cover pot without drainage holes, is one of the most common and insidious killers of houseplants. While aesthetically pleasing, it creates the perfect conditions for fatal root rot by trapping water and creating a hidden swamp at the bottom of the pot. Many plant owners, especially those new to the hobby, are diligent about not “overwatering,” but they are unaware that their choice of pot makes occasional over-watering a death sentence. Survey data highlights this knowledge gap, showing that while 33-35% of plant deaths are blamed on overwatering, the underlying cause is often the pot system itself preventing any margin for error.
When a nursery pot is placed inside a cachepot, any excess water from irrigation collects in the bottom of the outer pot. The plant is left sitting in a stagnant pool of water, completely submerging the lower portion of the root ball. This water displaces all air from the substrate, creating an anaerobic environment. This situation is an example of a perched water table (PWT)—a zone of complete saturation that forms at the bottom of a container above any layer with a different texture. The common myth of adding a layer of gravel to the bottom of a pot to “improve drainage” actually makes this problem worse.
Adding gravel or covering the hole with broken terra cotta not only defeats the purpose of ensuring drainage, but it also raises the level of the perched water table, moving the level of saturated soil even higher in the container and closer to the roots.
– Deborah Pilkington, NC State Extension, Durham Master Gardeners
The only way to use a cachepot safely is to always remove the inner nursery pot for watering. Water it in a sink, let it drain completely for 15-20 minutes, and only then return it to the decorative pot. This single habit prevents the hidden swamp and is one of the most effective measures against root rot.
Key Takeaways
- Air-Filled Porosity (AFP) is the most critical metric for root health, far more important than nutrient levels. Roots need to breathe.
- All potting mixes suffer from the ‘slump effect,’ a natural degradation and compaction process that reduces AFP over time, necessitating eventual repotting.
- Decorative cachepots and the myth of “drainage layers” are primary contributors to root rot by creating a hidden, suffocating perched water table.
Preventing Fatal Root Rot: The Hydrogen Peroxide Rescue Technique
Root rot is a swift and often fatal condition caused by anaerobic soil. Once the air-filled pores in a substrate become completely saturated with water, root cells, deprived of oxygen, can begin to die within a week to ten days. The dead roots are then attacked by opportunistic fungi and bacteria, leading to the characteristic black, mushy, and foul-smelling decay. By the time symptoms like yellowing leaves and wilting become apparent on the upper part of the plant, the damage below ground is often extensive. At this stage, simply letting the soil dry out is not enough. A more aggressive rescue intervention is required to save the plant.
The hydrogen peroxide (H2O2) technique is an emergency procedure designed to sterilize the root system and reintroduce oxygen. Hydrogen peroxide (3% solution, commonly available in pharmacies) breaks down into water (H2O) and a free oxygen radical (O). This oxygen radical is highly reactive; it kills the anaerobic bacteria and fungi causing the rot and provides a temporary burst of oxygen to any remaining healthy root tissue. It is a last-ditch effort to halt the progression of decay and give the plant a chance to recover.
However, this is a harsh treatment and must be followed by proper repotting to address the underlying cause—the poor substrate. If you suspect severe root rot, the following protocol can be attempted, but success is not guaranteed if the damage is too advanced. It is a rescue, not a routine treatment.
Action Plan: Emergency Root Rot Rescue Protocol
- Excise the Damage: Carefully unpot the plant and wash the soil from the roots. Using sterilized shears, meticulously trim away all roots that are black, brown, soft, or mushy, leaving only firm, white, healthy tissue.
- Sterilize with Peroxide: Prepare a solution of one part 3% hydrogen peroxide to two parts water. Soak the remaining healthy root system in this solution for 5-10 minutes to kill any lingering pathogens.
- Repot and Recover: Repot the plant in a brand new, highly porous, and well-draining substrate. Do not use any of the old, contaminated soil. Water it sparingly once, then wait for signs of new growth before resuming a regular watering schedule.
The first step to applying this knowledge is to diagnose your current setup. Perform the drainage test described earlier to quantify your substrate’s air-filled porosity and take control of your plants’ root environment.