A successful home makerspace is less about the tools you buy and more about the resilient, innovative mindset you cultivate.
- True learning happens in the “productive struggle,” where managed challenges and small failures build deep understanding and grit.
- Effective supervision means “scaffolding” your child’s learning—providing initial support and then gradually stepping back—rather than hovering and taking over.
Recommendation: Shift your focus from the perfection of the final product to celebrating the process of making: the problem-solving, the iteration, and the discoveries made along the way.
As a parent with a passion for building and creating, the dream of a home makerspace for your child is a powerful one. You envision a corner of the garage or basement, neatly organized with tools, where your little one’s imagination can take flight, building everything from go-karts to gadgets. The common advice is to stock up on safety gear, buy age-appropriate kits, and get a good pegboard. While these are practical starting points, they miss the heart of the matter. They focus on the *space* and not the *making*—or, more importantly, the *maker*.
The true purpose of a home workshop isn’t just to produce wooden dinosaurs or blinking robots. It’s to create an environment that builds mental muscle. The real engineering isn’t happening on the workbench; it’s happening inside your child’s mind. It’s about learning to confront a problem, to try and fail, and to try again with new insight. It’s about transforming a simple set of instructions into a launchpad for genuine innovation.
But if the goal is to foster this deep-seated resilience and creativity, how do we, as parents, facilitate it? The key lies in shifting our perspective from that of a project manager to that of a mentor. This guide will explore how to build not just a physical space, but a psychological framework for learning. We will move beyond the superficial and dive into the principles that turn tinkering into a transformative experience, where every mistake is a lesson and every project is a stepping stone to a powerful maker mindset.
This article provides a complete roadmap for parents looking to create a meaningful makerspace at home. We will explore the psychological benefits of hands-on work, practical advice on tool selection and supervision, and strategies to cultivate a true spirit of innovation.
Summary: Your guide to creating a home makerspace that builds innovators
- Why Does Tinkering with Tools Build Resilience to Failure?
- How to Choose Real Tools That Are Safe for Small Hands?
- The Hovering Risk: How to Supervise Sawing Without Taking Over?
- Maker Mindset or Follow Instructions: Which Builds Innovation?
- How to Store “Works in Progress” Without Losing Pieces?
- Homemade Microscope or Store-Bought: Which Is Better for Beginners?
- How to Build an Obstacle Course in a Small Living Room?
- Using STEM Exploration Kits: Turning the Garden into a Laboratory?
Why Does Tinkering with Tools Build Resilience to Failure?
The first time a child tries to hammer a nail, it will almost certainly bend. The first cut with a handsaw will likely be crooked. In a traditional academic setting, these outcomes are seen as errors. In a makerspace, they are data points. This distinction is the secret to building profound resilience. Tinkering provides a low-stakes arena for what educators call “productive struggle.” It’s the process of grappling with a challenge that is difficult but ultimately achievable. According to research on productive struggle, students learn most efficiently when they operate in the “Goldilocks Zone” of difficulty—a place where they can try, fail, and learn without penalty.
Unlike a math worksheet with a single right answer, a physical project has infinite paths to a solution. If a screw strips, the child learns about torque and material hardness. If a wood joint doesn’t fit, they learn about measurement and precision. Each “failure” is not an endpoint but an invitation to problem-solve. This iterative cycle of trying, failing, analyzing, and adapting is the very essence of the engineering process. It normalizes setbacks and reframes them as an essential part of creation. The emotional sting of failure is replaced by the intellectual curiosity to figure out why it happened.
This hands-on experience moves learning beyond theory and into a tangible reality. As one educational study notes, this approach is critical for deep understanding.
Productive struggle helps learners move beyond surface-level memorization and encourages them to grapple with complex concepts, thus leading to more meaningful and retained knowledge.
– ERIC Education Research Publication, How Productive is the Productive Struggle?
By engaging in this cycle, children build a robust “frustration tolerance.” They learn that a bent nail isn’t a reflection of their worth, but simply a technical problem to be solved. This mindset—the ability to persist through difficulty with a constructive attitude—is one of the most valuable and transferable skills a makerspace can offer, extending far beyond the workshop walls.
How to Choose Real Tools That Are Safe for Small Hands?
The idea of handing a child a real hammer or screwdriver can feel daunting, but the key is to choose the right tools and introduce them with a clear strategy. Toy tools are often frustratingly ineffective, teaching a child that their efforts are fruitless. Real, well-chosen tools, on the other hand, empower them and teach respect for capability and danger. The goal is to find tools that are ergonomically suited for smaller hands and bodies, allowing for proper control and reducing the risk of accidents. Look for lightweight hammers with stubby handles, screwdrivers with comfortable rubber grips, and small, fine-toothed handsaws that are easy to start.
Introducing tools should be a gradual process, not an overwhelming “here’s the toolbox” moment. A structured approach ensures that a child builds confidence and competence at each stage. It’s about matching the tool not just to their age, but to their demonstrated maturity and physical ability. The following steps provide a framework for this gradual introduction:
- Align with Developmental Stage: A tool that is safe for a ten-year-old could be hazardous for a four-year-old. Always consider their current physical coordination and ability to follow instructions.
- Introduce One or Two at a Time: Start with the basics, like a lightweight hammer and a simple screwdriver. Allow your child to master these before moving on to more complex tools like saws or drills. This prevents them from feeling overwhelmed.
- Start with Lighter Alternatives: Begin with the safest and most manageable versions of tools. This builds foundational skills before they graduate to heavier or more powerful equipment.
- Evaluate the Task, Not Just the Age: A complex task might be too much for a child, even if they have used the tool before. Assess their ability to handle the specific demands of each new project.
- Build the Collection Gradually: A child’s tool collection should grow with their skills. This paced approach maintains their confidence and ensures they are always working within their zone of competence.
This thoughtful progression turns tool use from a source of anxiety into a journey of empowerment. When a child can effectively use a real tool to shape their world, they gain a powerful sense of agency and capability.
As you can see, proper grip and control are possible when the tool is scaled correctly. The focus should be on this ergonomic fit, which is the foundation of both safety and skill development. By choosing and introducing tools with care, you are setting your child up for a lifetime of confident making.
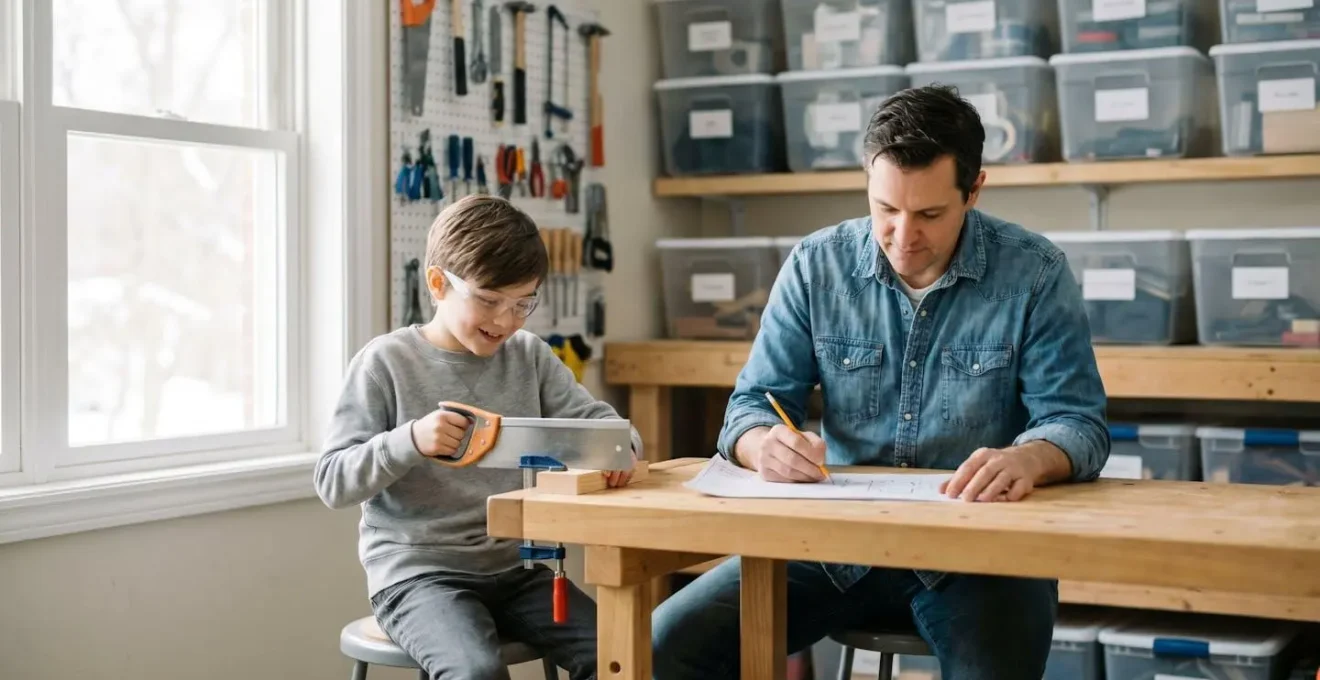
The Hovering Risk: How to Supervise Sawing Without Taking Over?
One of the biggest challenges for a capable, DIY-savvy parent is watching a child struggle with a task you could complete in seconds. The instinct to jump in—to correct the grip, to finish the cut, to “just do it right”—is immense. This is the “hovering risk,” and it can inadvertently rob a child of the most valuable part of the making process: the learning. The solution isn’t to step away completely, but to adopt a technique from educational psychology known as scaffolding. Scaffolding is about providing just enough support to help a child succeed, and then systematically removing that support as their own skills develop.
Instead of being a helicopter parent, you become an architectural support beam. You are there to prevent catastrophic failure, not to prevent every minor mistake. For a task like sawing, scaffolding might look like this: first, you demonstrate the proper stance and motion while explaining the ‘why’ behind each step. Next, you use a hand-over-hand technique for the first few strokes, letting them feel the rhythm. Then, you let them try independently while you stay close, offering verbal cues like, “Remember to use long, smooth strokes,” or asking guiding questions like, “What do you notice about the angle of the saw?”
The Scaffolding Method in Practice
As described by pediatric neuropsychologist Dr. Lindsay Katz from the Cleveland Clinic, effective scaffolding involves a clear, phased approach. To teach a complex skill, a parent should first demonstrate the technique while explaining the process. This is followed by hand-over-hand guidance to build muscle memory. After this initial support, the child is allowed to practice independently while the parent remains present to offer encouragement and ask guiding questions. According to this structured method of scaffolding, the level of supervision is gradually decreased over time. This approach ensures children master skills safely while building confidence through this journey toward gradual autonomy.
This method respects the child’s effort and gives them ownership of both their struggles and their successes. It communicates trust in their ability to learn and improve. As parenting expert Robyn Gobbel explains, it is a form of co-regulation that builds internal capacity.
Scaffolding is the support that we put in place that allows our children to be successful. Then, slowly, thoughtful, and sequentially, we decrease the amount of external support needed as our children develop that capacity to be successful on their own.
– Robyn Gobbel, Parenting Expert
By consciously choosing to be a scaffold rather than a crane, you empower your child to build not just their project, but their own internal framework of competence and self-reliance.
Maker Mindset or Follow Instructions: Which Builds Innovation?
Many introductory STEM kits and woodworking projects come with detailed, step-by-step instructions. These are excellent for teaching foundational skills and ensuring a successful first outcome, which is crucial for building confidence. However, relying exclusively on instructions can inadvertently train a child to be a good assembler rather than a true innovator. An assembler follows a known path to a predetermined outcome. An innovator forges a new path to solve a novel problem. The ultimate goal of a makerspace is to cultivate the latter: the maker mindset.
The maker mindset is a powerful combination of curiosity, resourcefulness, and iterative thinking. It’s the ability to look at a set of materials and see possibilities, not just a prescribed project. It’s about asking “What if?”—What if I used a different kind of fastener? What if I made this part hinge instead of being fixed? What if I combined this kit with parts from another? This is where true engineering and design skills are born. While following instructions teaches sequence and precision, the maker mindset teaches adaptability and creative problem-solving.
So, how do you balance these two approaches? Start with instructions, but treat them as a beginning, not an end. Encourage “hacking” the kit. After a project is built “by the book,” challenge your child to modify it. Ask them to add a new feature, improve its function, or change its appearance. This transition from following to modifying is the bridge to pure creation. It gives them permission to experiment and to see a finished product as just one possible version of an idea. Dale Dougherty, a key figure in the Maker Movement, emphasizes the transformative power of this approach.
By developing a maker mindset, students become self-directed, purpose driven, resourceful, and iterative.
– Dale Dougherty, Maker Movement Pioneer, TryEngineering.org
Ultimately, instructions build a foundation of technical skill, but it is the freedom to deviate from those instructions that builds an innovator. The most valuable projects are often the ones that don’t turn out as planned, because they required the most original thinking to complete.
How to Store “Works in Progress” Without Losing Pieces?
A makerspace in active use is rarely tidy. It’s a dynamic environment filled with ideas in various stages of completion. One of the quickest ways to derail a young maker’s enthusiasm is the frustration of a lost part or a delicate, half-finished project getting accidentally broken. This is why a storage strategy for “works in progress” is not just about organization—it’s about respecting the creative process. A good system reduces friction and validates the importance of these ongoing efforts.
The solution lies in creating dedicated, easily accessible spaces for these projects. Forget the single, jumbled “project box.” Think modular. Clear storage containers are invaluable because they allow a child to see their project without having to open and rummage through a dozen different bins. Assigning specific trays or shallow bins to each active project creates a “home” for all its associated components. This simple act of containment prevents tiny, crucial pieces from getting lost in the general chaos of the workbench.
Labeling is your best ally. A simple label with the project’s name on a tray or bin gives it official status. It says, “This is important and is being worked on.” This is particularly crucial for longer-term projects that might be paused for days or weeks. For smaller components like screws, electronic parts, or custom-cut pieces, using sectioned organizers or even old egg cartons can be a game-changer. It teaches the child an essential engineering practice: parts management. A well-organized space makes it easier to pause and resume work, encouraging more ambitious, multi-day projects.
An effective storage system, with its clear bins and dedicated project trays, does more than just keep the space clean. It creates a visual library of ongoing ideas, reduces the cognitive load of searching for parts, and protects the valuable time and effort already invested by your young maker. It turns potential frustration into a smooth, encouraging workflow.
Homemade Microscope or Store-Bought: Which Is Better for Beginners?
When looking to add a scientific observation tool to your makerspace, the choice between building a simple microscope and buying a commercial one presents a perfect case study in the “process versus product” philosophy. There is no single “better” option; the right choice depends entirely on the primary learning goal you want to achieve. Is the goal to understand the fundamental principles of optics, or is it to clearly see the stomata on a leaf? Answering this question will guide your decision.
Building a homemade microscope—using a drop of water as a lens, or deconstructing a cheap laser pointer for its lens—is an incredible engineering challenge. The primary learning outcome here is an intuitive understanding of how a microscope works. The child will grapple with concepts like focal length, magnification, and light sources. The final image may be blurry and the magnification low, but the child will have built the device that created it. This is a “process-oriented” activity that champions the maker mindset of improvisation and discovery.
Conversely, a store-bought beginner microscope is a “product-oriented” tool. It is designed to deliver a specific result: a clear, magnified image of a specimen. Its purpose is to facilitate biological or geological discovery. The child will learn about specimen preparation, focusing techniques, and scientific documentation. They will be able to clearly see and identify cellular structures, tiny insects, or crystal formations. This path develops the skills of a systematic scientist. As a comparative analysis of makerspace projects shows, the skills developed are distinct but equally valuable.
| Criterion | Homemade Microscope (DIY) | Store-Bought Microscope |
|---|---|---|
| Primary Learning Goal | Engineering discovery – understanding optics, lenses, and mechanics | Biological discovery – observing stomata, pollen, cellular structures, insects |
| Magnification Power | Low to moderate (10x-40x typical with water droplet or simple lens) | Moderate to high (40x-400x standard for beginner models) |
| Cost | Very low ($5-15 using household materials) | Moderate ($30-150 for quality beginner microscope) |
| Build Time | 1-3 hours including experimentation and iteration | Ready to use immediately (minimal assembly) |
| Skills Developed | Problem-solving, improvisation, understanding of optical principles, hands-on engineering | Scientific observation, specimen preparation, precision focusing, systematic documentation |
| Best For | Children interested in how things work, maker mindset development, limited budget | Children passionate about nature observation, detailed biological study, consistent use |
Ideally, a mature makerspace might include both. A child could first build a simple microscope to understand the principles, and then use a store-bought one to apply that knowledge to deeper scientific exploration. This progression allows them to be both the engineer who builds the tool and the scientist who uses it.
How to Build an Obstacle Course in a Small Living Room?
A makerspace isn’t confined to a workbench with woodworking tools. The engineering mindset can be applied to any challenge—including turning a small living room into an epic obstacle course. This type of project is brilliant because it moves engineering from a static, seated activity into a dynamic, full-body experience. It teaches spatial reasoning, structural design, and systems thinking on a larger scale. The constraints of a small space become a feature, not a bug, forcing creative solutions and modular design.
The first step is to treat it like a real engineering project: start with planning. Instead of just throwing pillows on the floor, have your child draw a blueprint of the living room on graph paper. They can then plan the course, thinking about the flow from one obstacle to the next and how to best use the limited space. This planning phase introduces concepts like scale, measurement, and resource management. The “build” phase then becomes about constructing modular components that are both challenging and easily storable.
The key is to think in terms of “engineered components” rather than just “furniture.” A line of tape on the floor becomes a balance beam that tests precision. A “laser maze” made of yarn strung between chairs challenges flexibility and planning. Cardboard boxes, the ultimate maker material, can be engineered into tunnels, hurdles, or towers. This approach transforms everyday objects into a system of interconnected challenges. It’s a fantastic way to practice rapid prototyping and iterative design in a fun, physical context.
Action Plan: Engineering an Indoor Obstacle Course
- Design a Balance Beam: Create a simple wooden balance beam (4-6 feet long, 4-6 inches wide) that is low to the ground and can be easily stored flat against a wall or under a sofa.
- Create Interlocking Tunnels: Use large cardboard boxes and duct tape to build tunnels. Design them with folds or interlocking tabs so they can collapse flat for easy storage.
- Build a Rope-and-Pulley Hoist: Engineer a simple “treasure hoist” system with a rope, a small bucket, and a pulley attached to a tension rod in a doorframe, which can be quickly installed and removed.
- Construct Modular Stepping Stones: Use carpet squares, foam tiles, or small wooden offcuts as modular stepping stones. Their uniform shape allows them to be stacked neatly when not in use.
- Integrate Planning and Measurement: Before building, have your child mark out the entire course on graph paper to optimize the use of limited space and plan the sequence of challenges.
By approaching an obstacle course as an engineering project, you teach a child that design and making principles can be applied to solve any kind of problem, whether it’s building a small gadget or creating a large-scale experience.
Key takeaways
- The true value of a makerspace is in building a mindset of resilience and innovation, not just creating perfect projects.
- Supervise using “scaffolding”—provide temporary support that is gradually removed as your child’s skills grow.
- Balance following instructions with encouraging modifications and original creations to foster a true maker mindset.
Using STEM Exploration Kits: Turning the Garden into a Laboratory?
The makerspace doesn’t have to be confined indoors. The garden, the backyard, or even a nearby park offers a rich, living laboratory just waiting for an engineering mindset to be applied. Extending the makerspace outdoors seamlessly blends hands-on building with scientific observation, showing that STEM is not an isolated subject but an interconnected way of exploring the world. The key is to create projects and kits that bridge the gap between the workbench and the natural environment.
Instead of just identifying plants, challenge your child to build the tools needed for deeper investigation. This could be as simple as constructing a soil sifter from a wooden frame and wire mesh, or as complex as building a weatherproof housing for a time-lapse camera to capture a flower blooming. These projects give a clear purpose to their making; the tool they build is not the end goal, but a means to a new discovery. This approach fosters a sense of authentic scientific inquiry, where they are not just consumers of information but active creators of knowledge.
Even simple, recycled materials can be used to create powerful learning experiences that connect indoor making with outdoor science.
The Garden as a Makerspace Laboratory
The educational non-profit Science Buddies showcases how makerspaces can transform outdoor spaces. In their documented projects, students use simple materials to engage in authentic engineering challenges in the garden. For example, they build working night-lights using intermediate circuits to observe nocturnal insects. They construct Rube Goldberg machines from natural materials like sticks and stones to study kinetic energy. They even engineer cardboard scissor lifts to explore simple machines while harvesting vegetables from raised garden beds. These hands-on projects demonstrate how authentic engineering challenges can be met with minimal expense, effectively turning any garden into an engaging, outdoor laboratory.
This fusion of making and exploring is the ultimate expression of the maker mindset. It shows that the skills learned at the workbench—problem-solving, design, and iteration—are not just for building things, but for understanding the world. By turning the garden into a laboratory, you are teaching your child to be a curious observer, a creative problem-solver, and a confident engineer of their own learning.
By focusing on the mindset over the materials and the process over the product, you can create a home makerspace that does more than just teach your child how to use a saw. You can equip them with the resilience, creativity, and problem-solving skills to become a confident, self-directed innovator for life. Begin this journey today by identifying one small project where you can practice scaffolding and celebrate the productive struggle.